Thursday, February 17, 2011

foods that really stink when they expire

Ok, I'm not going to make a long post today but I opened my fridge today and smelled a funk, and now I'm inspired to share some wisdom I've picked up over the years.

I don't know why, but I know this to be true: you should never let the following foods go bad in your fridge because they stink utterly.

  1. broccoli
  2. black beans
  3. cauliflower
I'm off to burn some incense now. If you know any foods that should be on this list, submit them in your comments. Help me avoid stinky situations in the future.

Tuesday, February 15, 2011

Super Moist Banana Walnut Bread!


I try to be good to the Other Adult. I make her a new bread or muffin every week, and so she can eat them for her breakfasts in the morning.

Weekday mornings at our house are insane. Probably we are not alone in this respect. The Other Adult wants to wake up as late as possible to maximize the amount of time she spends sleeping. We get up at 6:10 in the morning. The Kid and the Other Adult leave for school together at 6:40. This gives the Kid 30 minutes to eat breakfast, get dressed and stuff her backpack with last night's homework. Meanwhile, I make coffee and assemble lunches. I have to count down seconds for the Kid, so she doesn't spend too much time on any one task. As I make the coffee I say: "You have thirty-five seconds to brush your teeth." then I count backwards from thirty-five, loud enough so she can hear me from the bathroom. (Is thirty-five seconds enough time to brush one's teeth? Probably not, but I count very slowly, so that each "second" is more like two seconds.)


This weekend I made banana nut bread for the Other Adult's breakfasts. I pack her lunch with one slice every morning. I like packing my family's lunches. Sometimes to be cute I include goofy little notes on bright pink post-its. I like taking care of the people in my family.

Moist Banana Walnut Bread

Preheat oven 350. Grease two 9 inch bread pans.
  • 1 3/4 cups sugar
  • 1/2 teaspoon salt
  • 2 1/4 cups flour
  • 3/4 cup olive oil
  • 3 large eggs
  • 1 teaspoon vanilla
  • 1 1/3 teaspoons baking soda
  • 1/4 cup buttermilk(I make my buttermilk from soy milk and vinegar)
  • 1 cup chopped walnuts
  • 1/2 cup ground walnuts (ground in a mortar and pestle or in a food processor)
  • 5 mashed bananas
Mash the bananas with your hands, then combine all the ingredients in a large bowl. Use black bananas if possible. I didn't have black bananas, so I peeled then microwaved the bananas until they were warm, but not hot. Divide the batter evenly between 2 bread pans and bake for 45-50 minutes. The toothpick should be almost clean, but not quite.

Monday, February 14, 2011

Sourdough Explained

Some types of bread are made without yeast. Some breads are made with commercial yeasts that have been packaged in packets or jars and sold in grocery stores. And some breads--sourdoughs--are made with wild yeasts that have been cultivated in fermented flour.


The picture above is my sourdough starter. The starter is fermented flour that supports a live culture of bacteria and yeasts. Every night, I feed my starter. I remove about half of the old starter and throw it away, then I add a cup of whole wheat flour and a cup of water. I mix it vigorously, then I let it sit. And the next night, I do the same. And so on. Over night, the starter doubles in size. It collapses before I wake up in the morning.

My starter smells like rotten apples, vinegar, and alcohol. The smell of it reminds me of the apple tree in the backyard of the house where my family lived when I was in middle school. My parents paid me a dollar a week to pick up the fallen apples from the lawn because the fruit attracted wasps and bees. The apples were always warm from sitting in the sun, and full of worms and holes. The shame of it was that the apples had poor texture and flavor. They weren't good to eat, but they had a strong smell.

The night before I make a loaf of bread, I feed the starter early. When the starter appears the most active (bubbly, expanded in size), I mix a ladle full of starter with flour and water. It proofs overnight. This product is called the "sponge".


The pictures above and below are of the sponge.


The sponge doubles in size over night. The following morning, the sponge is added to the rest of the flour, water and salt, to make the dough. This dough is kneaded, then flattened, then rolled into a tight round, then allowed to rise, then flattened, then rolled into a tight round, then allowed to rise, and so on. This happens some three or four times. It takes hours.


You can see in the pictures above that the dough doubles in size between the first picture and the second. This happened over the period of an hour.

In the final stage, the dough is divided into two parts, then allowed to rise again. When the dough has tripled in size, it is dusted with flour, the top is cut with a knife (this is to relieve some of the surface tension and allow the dough to expand in the oven), sprayed with a fine mist of water, the oven is preheated to 500 degrees, and boiling water is dumped in the tray in the boiler tray in the bottom of the oven. The loaves are inserted and after ten minutes, the temperature of the oven is decreased to 350-400, and the loaves bake for approximately 45 minutes.


The pictures above documented my first successful attempt at making a loaf of sourdough. Before tonight, I'd tried to make sourdough at least four times. My failed loaves were always too dense. This bread was made from a whole wheat starter I began on New Year's.

Starters, when cared for properly, can basically live forever. Years, decades. It's a colony of live bacteria. Most beginning sourdough recipes recommend that you think of a starter as like a pet, to be monitored and cared for.


I've had so many failed loaves of sourdough before today that the Other Adult in the family told me, even after this loaf was baked and I cut it open and fed her a slice, that she did not believe I had made sourdough.

Sourdough has become a myth in our household. Like the lost city of Atlantis, the Holy Grail.

Thursday, February 10, 2011

Simple Croutons

Ever since I started baking my own bread a year ago, I've occasionally experienced an annoying surplus of bread. The ends of the loaves dry out in my fridge and then I've no idea what to do with it. I hate throwing it away--that's wasteful, and I feel an attachment to it anyway, because it was made my by own hands.

There's an excerpt in The River Cottage Bread Handbook--a book I own and refer to frequently--that has a long list of various uses for old bread. The most useful of these suggestions is to make croutons.

Simple Croutons

Preheat oven to 350. Prep time: 10 minutes. Bake time: 10-20 minutes.

Ingredients
  • Dry crusty bread
  • Olive oil
Tear or slice the croutons into little chunks. My size preference is for 1-2 cm cubes (approximately).


In a big mixing bowl, drizzle the bread with olive oil and toss. The pieces should be slightly moistened on the outside, but not soaked.


Arrange the bread on a baking sheet and bake until golden brown. Allow to cool then store in a lidded container or gallon bag.


That's it! Of course, this recipe can be altered in any number of ways. The croutons can be garlicked (I maybe made up that word, just now) or salted, sprinkled with Parmesan or some other cheese, baked with herbs, whatever. I sometimes add salt but I like the versatility of plain croutons. These croutons make tasty, crunchy snacks, they are delicious in soups and salads, and when a recipe calls for breadcrumbs, I pop croutons in the blender or food processor.

Wednesday, February 9, 2011

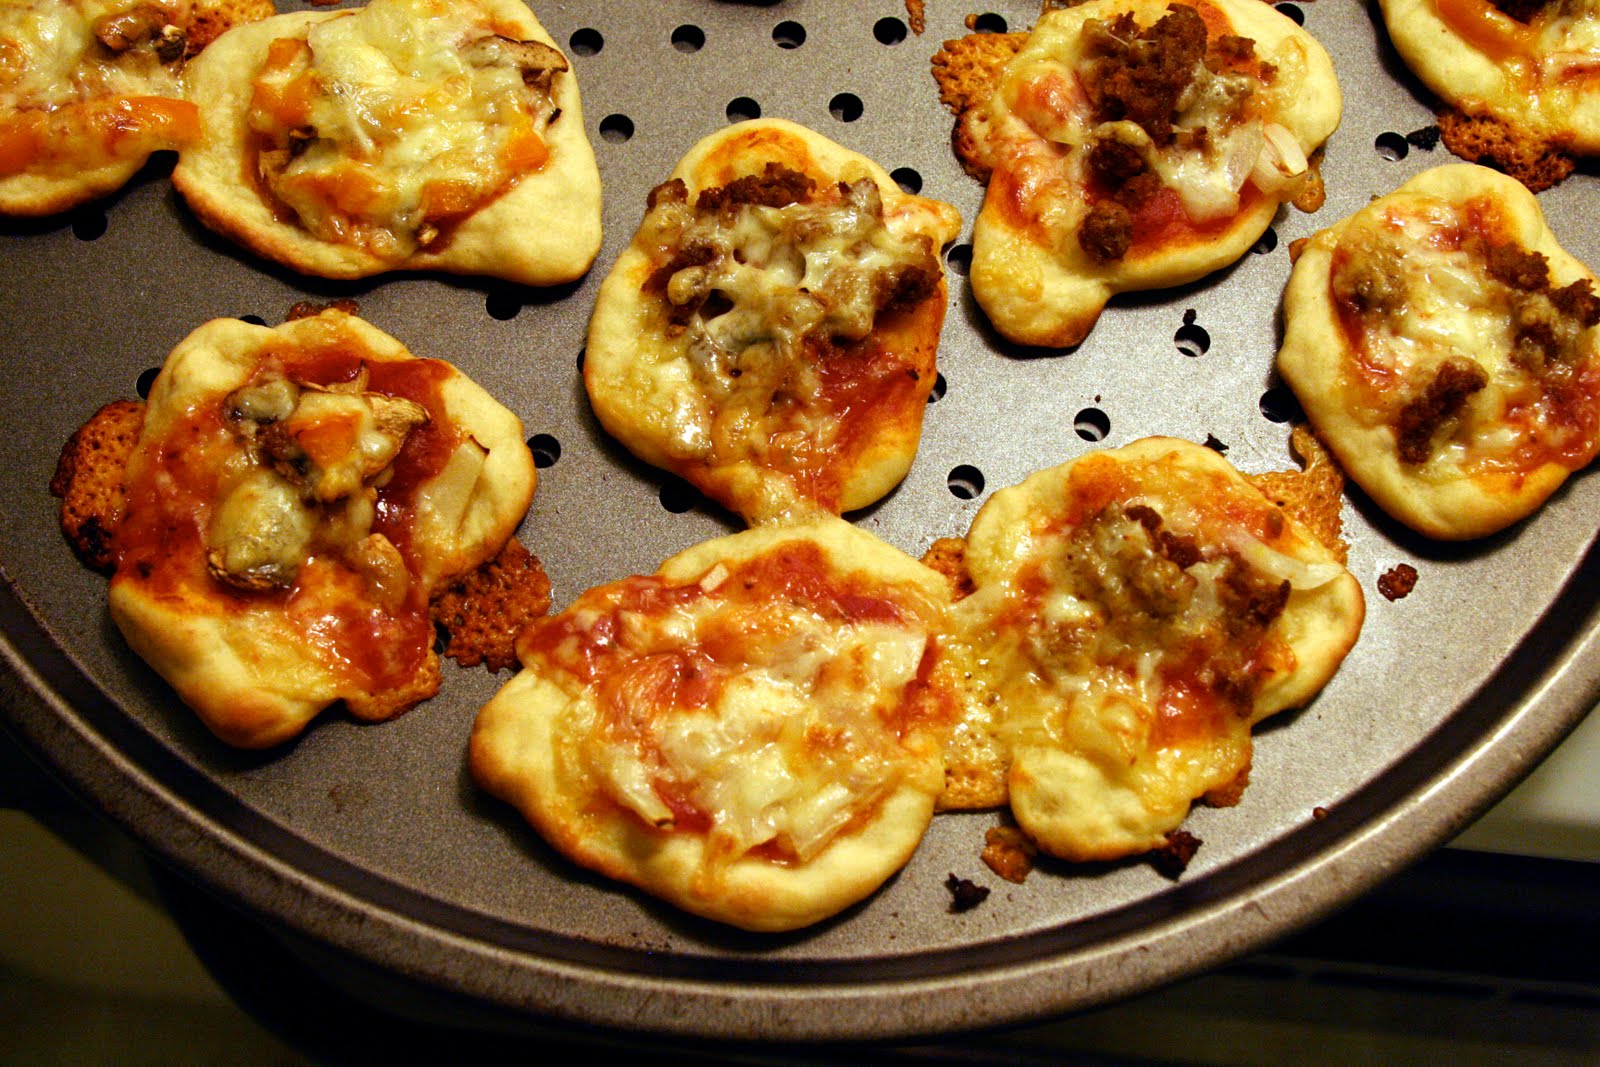
Mini Pizza Bites

One thing The Other Adult and The Kid never tire of is pizza. I have different recipes for different occasions. These mini pizza bites make a fun appetizer or a perfectly cute and interesting main course.

Mini Pizzas

Preheat the oven to 475.

Thin Crust Pizza Dough, originally from Cook's Illustrated, but modified for my purposes
  • 2 cups all-purpose flour
  • 1 1/4 tsp yeast
  • 1/2 teaspoon honey
  • 1/2 teaspoon table salt
  • 3/4 cup water
  • 1/4 cup olive oil
Combine ingredients in food processor and set aside while preparing toppings.

Pizza Sauce
  • 1 16oz can crushed tomatoes
  • 1 teaspoon dried basil
  • 1/2 teaspoon oregano
  • 1/2 teaspoon thyme
  • 1 tablespoon garlic Paste
  • Salt to taste
Ok, this is going to drive some people crazy, but I don't measure these ingredients at all. I dump the tomatoes in a sauce pan and add dried basil, oregano, thyme, garlic paste and salt. I heat and taste, and keep tasting as it heats. I find that the garlic is important, but the other herbs vary depending on what I'm in the mood for and what I have on hand. The measurements I provided above are a guess. I also sometimes add a little olive oil or veggie broth if the sauce is a little too thick. If the sauce is too thin, it should cook for longer. I usually make more than I need, and keep some in the fridge.

Pizza Toppings:
Grated Cheese (your choice--cheddar, mozzarella, fontina, harvati, meunster, etc)
Small sliced vegetables (again, your choice)

While the sauce is cooking and the dough is rising, cut small toppings for each pizza. I find that the mini pizzas require proportionally fewer toppings than a regular 14" pizza, so I make little piles of each different type of topping. The toppings I enjoy most are peppers, onions and mushrooms, and vegetarian sausage. For the sausage, I usually use Morning Star Farms vegetarian sausage patties, heated slightly and then cut into crumbles.


The Other Adult and I usually assemble these pizzas together. We start an assembly line, first making little 2-inch dough rounds on the pizza pans (this probably yields around 24-30 mini pizzas), then spreading a dollop of pizza sauce on each mini crust, then adding toppings, and finally adding cheese.

Part of the fun with this recipe is the resulting combinations of toppings. If I've prepared four different toppings, not all the toppings will fit on all the pizzas, so each mini pizza will have a different combination of the pizza toppings I've prepared.

These bake on the pizza pans for about 10 minutes. This same recipe can be used to prepare one 14" pizza. The only difference for a 14" pizza is that it's baked at 500 for about 10-12 minutes.

If I'm serving these for company, sometimes I'll get more creative with my toppipngs. Goat cheese, basil and tomatoes make a nice combination.


Black Bean and Feta Salad with Balsamic Vinaigrette

Several years ago, The Other Adult in the family made up a salad recipe that has since become a staple in our house. This salad is so versatile and easy to prepare that we can serve it with nearly everything, but most especially we like eating it with pizza. I started making my own vinaigrette about a year ago. The dressing recipe is adapted from Emeril's recipe on the food network website, because it was the first thing that popped up online when I googled "vinaigrette recipe" and it was a recipe I had all the ingredients for.

Balsamic Vinaigrette:
  • 1/4-1/2 cup balsamic vinegar
  • 1 teaspoon brown sugar, optional
  • 1-2 teaspoons garlic paste
  • 1/2 teaspoon salt
  • 1/2 teaspoon freshly ground black pepper
  • 1/4-1/2 cup olive oil
I use an old salad dressing bottle and put all the ingredients in through a funnel, dry and chunky ingredients first, liquids last (the liquids push the rest through the funnel). Screw the cap on and shake. I don't always add the same amount of balsamic vinegar or olive oil--in fact, I eyeball all the ingredients. The original recipe called for 3/4 C olive oil, which was just too oily for me.

Black Bean Feta Salad
  • mixed greens or butter lettuce leaves
  • black beans
  • chopped walnuts
  • crumbled feta
  • balsamic vinaigrette
I put together the ingredients in whatever proportions I feel like and it turns out deliciously every time. A word about the ingredients: I use canned beans rather than dried then rehydrated beans. I know that most foodies look down on this practice, but I rarely know the night before when I'm going to prepare a meal with beans. It's just not practical for my lifestyle at the moment.

Friday, February 4, 2011

Paneer


This has been one of the most amazing nights I've had in weeks. Possibly, months.

No, weeks.

The most amazing thing is taking place in my kitchen.

It started a few months ago when the Other Adult in my family began pestering me to make Malai Kofta. I took a few quick looks at the recipes online and determined that Malai Kofta, done properly, is time consuming and requires some ingredients I don't normally keep around the kitchen. Words like, "raisins" and "heavy cream" popped out. And worse, "paneer". (actually, there were a lot of words in these recipes I had never heard of and was forced to ignore--one example: jeera. Jeera, in case you aren't aware, is (are?) cumin seeds. I'm going to have to use cumin as a substitute)

I needed paneer. I called around to a few Whole Foods grocery stores, where the clerks were puzzled and asked me what paneer was. I told the Other Adult that I couldn't find paneer and silently wished she would drop it.

She gave me the phone numbers for a few ethnic grocery stores in the area and asked me to call around. I put this off for three months until last night when bickering ensued and I decided I had waited long enough.

Today, I placed several annoying phone calls to ethnic grocery stores located around my office. The most degrading of these phone calls went something like this:

me: Um, yes, I was wondering if you carry paneer?
grocer (I actually heard him rolling his eyes through the telephone): we carry cheese.
me: Paneer?
grocer: "paneer" means cheese.
me: yes, I know paneer means cheese. I'm looking for a specific kind of Indian cheese. Paneer.
grocer: we don't carry Indian cheese.

and so on. Could he could hear my midwestern ignorance over the telephone?

After hanging up, I googled paneer.

There's a wiki article about paneer. It's made by combining milk with lemon juice, separating the curds from the whey, and pressing the curds in a cheese cloth. I decided very suddenly to make the paneer myself.

The recipe I am following came from Manjula's Kitchen and is as follows:

Paneer
Ingredients
  • 8 C (1 half gallon) milk
  • 1/4 C lemon juice
  • also needed, cheese cloth
Combine lemon juice with 1/4 C water and heat. Meanwhile, bring milk to an almost boil--stir frequently (my milk burned to the bottom of the pan and I stirred quite a bit) Once the milk is almost boiling, gradually stir lemon juice mixture into milk. Remove from heat when curds separate from whey.

Place cheese cloth in a strainer over a large bowl. Strain the curds from the whey, catching the curds in the cheesecloth, then rinse curds (still in cheese cloth) under cold water. Knead the curds a little bit, then roll the cheese cloth into a ball around the curds, squeeze the water from the curds. Press the cheese-in-cheesecloth under a very heavy pan, for two hours. In two hours, remove the pan and the cheese cloth.

Just FYI, it's really impressive to watch curds separate from whey. I never thought to make cheese in my home. This is one of the huge thrills I get from cooking: making food I once thought could only be bought from stores. That could only be obtained wrapped in plastic, sold in boxes.

My current regret is that the Kid is grounded and in her room after a debacle at school today, and she missed the show.